Tuesday, September 15, 2015

Beginning the Cupboard Bed

 
Make sure you read the post and see the photos of cupboard beds farther along in the blog.
 
 
I was able to put in the deck for the bed, and the two panels on the right and left will eventually become the back boards of the  shallow book cases on either side of the opening.  They are just tacked up there to get a feeling for the space.
 
The boards sticking out like a rather ragged tongue are just there so I could estimate the size and shape of the table.  I have some nice bird's eye maple for the tabletop.  This will slide in under the bed like your grandmother's cutting board used to slide out from the counter in the kitchen.  I just put my chair there and started fiddling with the dimensions using the boards I had lying around.  The black line across the opening is just a piece of angle iron which supports the edge of the bed deck as it crossed the cut out space above the table top, where there is no support.
The space below will have shallow cupboards either side of the table and the entire area below the bed will be storage.

 
The deck is 3/4 inch plywood, not in a high grade.  I plan to put commercial carpet down on it so I will not get too many splinters.  The ceiling is finished and the entire inside will have moldings covering the seams and nails.  It will be painted a hydrangea blue, and have a hydrangea border around the ceiling.

 
I have a coverlet and shams of this color, the walls a bit darker.  I also have snowy white quilts for this size bed, which is a double.  It really would not have been a big sacrifice to do a queen bed, but I just decided that that few inches was better spent elsewhere.


Just the head end of the bed alcove.  Alcove is probably a better word for this unless I choose to put doors on the opening, making it a cupboard.
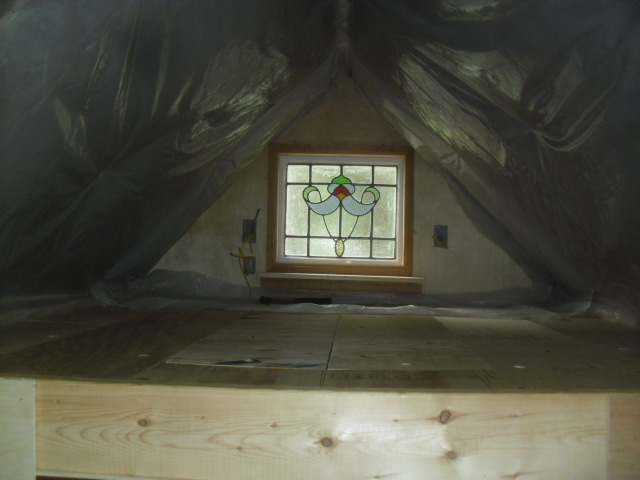
 
The ceiling above the alcove is the floor of the loft.  I know it is a little difficult to see, but I cut the decking if the upper loft into pieces to allow me to lift them up like doors, with finger holes, for storage in between the beams.
 
I bought Memory Foam double mattresses for both levels, still in their boxes and waiting to go into the space.  Harry and I already took a nap in the alcove earlier today.  He is not too comfortable in the trailer yet, but he seemed to be very comfortable in the alcove.  It is enclosed, but offers good views out of the window and the door and window opposite.

Colonial Style Chandelier

 
Back in the late 80s I think, the tree that stood outside the back door of our house in Houlton, Maine, a huge solitary oak, got some kind of bug infestation.  I am not sure what it was, nor am I sure that it was dangerous to the tree.  But, I came home one day and it was gone.  That tree that had a huge branch over the driveway and had a big tire swing in it.   My friend almost lost an eye swinging in it one time, and she was never allowed to come back, but we had never ending fun with it, along with a number of other friends. 

 
I was devastated when it was gone!  But Dad, Paul McLaughlin, my stepfather, had a lathe in the basement.  I stood at his shoulder, and we turned the center column out of a piece of that tree...I think it may have been from the branch with the swing, but I cannot remember.  It followed a colonial Design, that I was very much into at the time, as I owned a mid 18th century house in Wiscasset, Maine


I had the iron forged for the candle arms and hanging bars...then when they did not really fit well, I made my own in my spare time at King's Landing, where I occasionally blacksmithed as a relief person a few weeks in the summer.
 
 
I decided they would be a good addition to the Shepherd's Hut, so here it is on trial while I finish the interior.
Meanwhile, I finished the frames for the display cases on each side of the bed alcove, as you can see in the top picture.

What Will Fit?

It is important to know how much of your stuff you will be able to have in your space.  You will have to arrange storage and or other housing for the things you really want.  Here, I am trying out some of my collectibles...a tiny fraction, to see if the shelving is well spaced etc.


More Work on the Cabinets

 
Harry surveying his kingdom.  Just to give you an idea of scale here, Harry is a rather large Cairn Terrier, about 21 pounds.  He cannot help being a little zaftig.  He is getting older.


Ready for the new door.  I have a pair, or a nearly identical pair of 18th century strap hinges with bean ends that will mount on the outside of the door.  I have the wood all cut for the outside layer of boards, and am waiting to complete the interior layer.  A thin sheet of plywood will sandwich in between to keep drafts down.  The inner layer will be ship-lapped, but my neighbor Mike Keefe offered a few boards he had drying in his back yard.  We began planing them down to remove the rough surfaces before making the ship lap.  Unfortunately, after about three passes through the planer, we spent an hour trying to figure out why it stopped working.  He had broken a belt.  We are waiting now, for a belt to arrive to continue.


 Much of the cabinet work done, doors made.  The middle doors are made from left over lengths of tongue and groove bead board with battens on the back, and the two side doors are left over pieces of ship-lap done the same way.  I plan to use either commercial H hinges, HL hinges or butterfly hinges.  All available at retailers, and Amazon.com and Ebay, but you have to read descriptions carefully as they can be very small and inadequate.  They can also be frightfully expensive, especially when you need 8 of them.  I already have 18th century forged bean strap and pintle hinges for the front door, I just have to make the door now to use them....another big project, and hard to settle on the design.  I saw some on Youtube in a video of a house in Stratford-upon-Avon.  I think that with minor adaptations, they will do nicely.


Just  a quick mock up to see what this will look like with a plank floor.

 In the 19th and 18th centuries, the people in these old houses would have used the lumber available.  If an nice oak happened to fall, they might saw up the wood into planks, but the vast majority of flooring was just wide pine.  When a nice wood was used, it was usually in the best room only, like the parlor. 

Sometimes they would put splines in, but over time, the spline grooves crack and leave splintery cracks or the whole piece will detach leaving a large void in the floor.

.  Floors were often painted, sometimes with faux rugs or faux grain or colorful patterns.  Sometimes they would take every color in the house and splatter the paint in an all over speckle.
The name often given to the amber colored floors that you sometimes see in old houses was called Pumpkin Pine.  Another misconception...Punkin stain was used and the name was perverted to pumpkin. 

There should be a little gap between the boards, as the planks will swell in humidity and buckle if butted up together.

I would love to use oak on these floors, but you know, with a single board going for $40.00 I do not see that happening.  Plus, The only oak boards I can get without going to the mill will require lots of processing just to get to that stage where they can be laid and they are red oak.  The color seems very un-natural to me..  They require easing or chamfering on all the edges, splines etc.
 
I am thinking just an oil finish on the pine or maybe a bit of a yellow-orange stain like the antiques will be good.  On the other hand, the planks in extremely old houses are so very dark from age and dirt build-up that they seem almost featureless.  That means that knots are not apparent, so a lower quality board will suffice.  The very old boards have raised spots where the knots do not wear while the surrounding floor does.


Wainscoting in Progress

The wainscoting is nearly done

 There needs to be a shelf and molding on the top of this horizontal molding as you can see it on the other side.
 
 
the rather low baseboard will have a molding on top of it. 

 
Two more pieces of casing will go under the window, every 16 inches all around the room.
There will be only a suggestion of this wainscoting behind the Welsh cupboard and over the sink.

The Bed Alcove Almost Ready to Paint

The entire interior of the hut is lined, with the exception of the ceiling of the loft, with 1/4 inch hardwood plywood.  This is a very smooth surface and will take paint beautifully.  It is unfortunate that despite the fact that I like wood, it is too beige/gold/brown to make the space feel large.  Those earth tones will feel oppressive in the small space.  Remember that the entire hut is only 87 inches wide, and 18 feet long on the first level and a 2 foot extension in the loft.  This will feel very claustrophobic over time unless something is done to lighten up the space.  All of the seams between the panels need to be covered, and all the lines of the screws attaching the panels to the studs need to be covered as well.  I found a casing in the molding area of my local Home Depot that is simply a flat piece of wood with slightly rounded edges.  This I nailed and glued over all the seams and stud lines, then tacked them up with finish nails.  These will also have another molding over them, just running down the center of each one.  This will be astragal molding, which is a symmetrical profile.  Then all the walls and moldings will be painted a white, and the alcove and accent fabrics, etc., will be a light blue to help in expanding the space, as blues tend to recede to the eye.
 
 
Though too damaged to be reused as is, I cut down an old mahogany mantle I had stored in the barn to use as a headboard.

 
I added astragal molding to the seams and rows of screws, butted into the cornice molding that is just a plain molding that is proportionate to the size of the bed alcove.

 
More of the moldings covering the screws in the bed alcove.
One of the things I learned from this process was that I needed to do a chalk line or a pencil line to position the screws into the studs.  Just the 1/8 inch wandering from the straight line makes it very difficult to apply the molding straight when the moldings are so narrow as these.  I know that someone will lie in this bed someday and say: " Who the hell put these moldings up, they are crookeder(is that a word) than hell!"

Monday, September 14, 2015

The French Lieutenant's Woman

Here is the address for a clip from "The French Lieutenant's Woman".  There are several related clips that will show this room as well. This room was the inspiration for the interior of the Shepherd's Hut.  As I got deeper into it, I realized that there was going to be less and less wall space than I wanted, but it still inspires the paneling with moulding battens and the white, though there will be blue and even a couple of spots of yellow or apricot to warm it up.  The loft will also be white, but I have a blue and white floral coverlet for the bed. 
When I looked at this film, I rhapsodized over the space with its simple white walls and woodwork.  Then I realaized that it was done in 19th century northern England, and I could not even imagine all that white in cold, damp England.  When I applied the white in the tiny house, I purchased a white that had a bit of orange in it.  The color will be barely perceptable if at all, but the bit of warm color will help a lot.
Whites with yellow, pink, orange and violet will help to warm a space a bit.  Greens, blues and lavenders will cool a space a bit.  Beige is almost always slanted toward these colors as well, and can affect the feeling of warmth or coolness in a space.
Much as I love wood, be very careful about having a space in all wood tones, because they can seem very claustrophobic. 

https://www.youtube.com/watch?v=yx2giHzJ4-I