I eventually had to revert to a real trailer chassis, simply because the parts for the traditional shepherd's hut were hard to access. As I get my ducks in a row here, I will have all in place so that I can do the more traditional design. Meanwhile, I have done this first step, so I will leave it here for those who want to continue.
The whole culture of tiny houses seems to be all about building on a trailer or constructing a chassis with wheels, but this or any other Tiny House would be just as happy on a foundation, skids, posts or whatever.
In my case we are going to build on a metal 2x4 steel tubing frame that corresponds to a slab, bolting it down to the frame, and placing the whole thing on oak axels and steering mechanism and cast iron or wrought iron wheels.
These wheels will not allow the cart to be taken on the road, except for very slow speeds and over short distances.
The first order of business is to have the basic frame built. It could be made from "I" beam, but I feared the inside corners catching water and mud and eventually rusting. The tubing will be fairly smooth all over. It will have tiny holes here and there to let expanding air out of it while it is heated in the welding process. Those can be filled with silicone, or solder to make it water tight. The whole thing can be powder coated, but well maintained paint will do well also.
Along the edges of the frame, that corresponds to the foundation, bolts can be welded to the outside rim, the head extending down to the bottom of the steel, and extending up far enough to go through the sills and bottom member of the wall framing. The fact that it is on the outside, means that the sills will extend over the edge of the steel so that a hole will accept the bolt.
Alternatively, you can drill right through the steel and put a bolt up through the steel and through the layers of wood. This is easy and tough, but it also opens more places for rust.
Or, a headless bolt or threaded rod could be welded on the top of the steel to go through the wood.
The first option gives you a couple of inches of extra floor space, and since the construction is so light, it will not affect the stability of the building.
You have to do a little planning here. I always see these videos where the people bolt their house down to the trailer, and I wonder..."now how are they going to do repairs once the whole thing is constructed. Are they going to tear the bottom foot of the walls and floor of the house apart just to get at these bolts if they rust, or come loose or squeak?"
I think that the ideal, and this does not work for the welded to the side option, is to start the head of the bolt inside the wall and drop it down through the frame. Access to the nut will allow you to remove the house and put it back and to tighten it as necessary. It must be painted over and over again so the bolt will not rust and freeze up on you.
The other alternative, and the one I plan to use, is to put deep baseboards all around the floors of the building, so that the baseboard can be removed to give access to the bolts. Do not, in this case, put bolts anywhere that they cannot be accessed in this way. Any of the options above can be used with this.
These huts may have the wheels either outside the walls of the house, and up along the siding, or under the walls and the cart. They are a little less stable in wind if they are under the wagon, but screw tie downs will keep either one stable. These are a bit like the screws that you put into your lawn to put a dog chain on. A big augur screws the rod into the ground, and a ring protrudes from the earth to chain the corners of the wagon down to the ground.
After the axels and steering mechanism are made, then brackets to hold the axel and supports for the wheels can be welded to the frame. Do not do all of this till axels are made and ready to be mounted, as they can be hard to make and maintain level from front to back.
I will upload drawings of all this.
The frame will be the length and width of the proposed building (unless you plan to gain a few inches by welding the bolts to the outside as described above.)
These huts can be as small as 6x12feet. This is impossible to live in, and the narrow dimension, while probably perfect for an undernourished 19th century shepherd, would not be useful at all for modern 5'10" and up average people. It would be like sleeping in a loveseat. Sleeping the long way, leaves no room to live.
I think that 8 feet wide is about the minimum for modern Americans, but measure your family and see if other widths would work better. You do not have to be a slave to tradition and sleep with your knees up in a fetal position. Remember though that the wider you go, the more pressure you place on the rigidity of the axels.
I think that 8 feet plus or minus the width of the sills over the edge of the frame is a good number to stick to. If you plan to use a modern trailer, you are only restricted to the width of the trailer you buy or how much you increase the width by welding on extra iron. The wheels can be worked around or over.
Remember to get an accurate estimate of the bearing ability of the trailer's construction. You do not want the trailer bottoming out on the roads, flattening the tires or flexing to the point of cracking walls, floors or framing of your final house.
Saturday, August 23, 2014
Friday, August 22, 2014
Shepherd's Huts and Gypsy Vardos
There are a number of places that manufacture shepherd's huts on the internet. Any number of them would be a good choice if you live in England, Scotland, New Zealand, Australia or some other place where they are built. But, even to get parts shipped to the US is a real expense...One thousand pounds just to get the wheels here to the Boston area...good Christ!
The shepherd's hut is a very simple affair if you go traditional. No frills, little insulation if any...minimal windows and simple siding...usually galvanized corrugated steel.
These carts were meant to be used in the fields in England. It was good to be near the flock when they were lambing...catch birth problems, scare off predators...and they were meant to be hauled from field to field, dirt roads, not on the highways. Construction is super light, much like gypsy vardos,(caravans) diagonal bracing was from the broad rectangular pieces of siding. Many were not braced diagonally at all, and some still are not, with clapboards nailed directly to the spindly studs, and narrow plank interiors.
These days, they have wandered from the true and original form. They can be very luxurious.
Similarly, you can make them look very traditional for the romance, or you can make them as practical and luxurious as you like. Just because I have chosen to make the outside as much like the originals as possible because I like the romantic look, you could do this on a trailer instead of the iron wheels and it could be just as mobile as you like, carpet(YUK) if you like, beautiful stained glass, kitchens, baths, lovely furniture and fabrics.
My departures will be: cork flooring, a beautiful raised panel cupboard bed, antique stained glass in the door, a compact kitchen, and composting toilet and shower combo....my best MINI-furniture and a video set-up.
Here are some pictures from Wikipedia of gypsy Vardos.
They are absolutely glorious, but I know I could never keep it up properly.
I include a couple of images of Shepherd's huts from a private website. I hope they will forgive me as I include their website. I will try to add a couple of other web addresses.
Other good sites include:
I am sure a little searching will find more.
How to Choose From So Many Options!
There has been some hype on Youtube and in a number of other places about the Tiny House Movement.
This is an idea whose time has come. I have been writing bits and pieces about this for some time but now my circumstances have changed and I am in the position that I have to find a place to live in this Neo-America of ours.
A few months ago my husband died. John provided a good portion of our income. We had a nice house together, here in southern Massachusetts, but with only one income and even with room mates, I just cannot afford it anymore. Thankfully, I am close to retirement age. I could retire in January, though it is unlikely since the payments will be small. But, it does give me some freedom to make decisions. I could move into a small apartment or a room. That would eat up income. I could move to Italy where life will be cheaper...maybe later. But, though I cannot retire, I can build a tiny house....live in it till I retire on leased land, and them move my little palace to Maine to be near my sister.
I have been fascinated with the options available.
The commonly seen Tiny House is a little too cut up for me. It seems to me that it only accentuates the tiny-ness of the space. It is a good option for many though. I like a 210 square foot modern style house that has been on Youtube, but it is a little too clean lined for me. Its wide open interior seemed more like a space that would not creep up on you in time.
But, then I looked at Gypsy Vardos or Caravans...wonderful...charming...romantic...little floor space and very difficult to keep painted properly... too ornate, but what a hoot to drive through my home town in!
Then I noticed Shepherd's Huts on Youtube and on the Internet. These would be just right for me. They have more open floor space per square foot than the Gypsy version, are simple to construct...I do not plan to drive the thing around the country...just live in it, then move it once to Maine and build a studio or a second cottage. I could build it on skids instead of cartoon worthy wheels...and that is probably a cheaper option, but not so romantic.
They have much of the romance of the Gypsy Caravan, but the simple construction and exterior would be easier to keep up.
So, I have decided to take action.
I have pre-ordered some of the interior appointments to force me to get going and not turn back. I have begun getting estimates for the chassis.(I have decided to put it on my own frame rather than a trailer so I do not have to contend with the wheels and because there just are not too many trailers available that are the right size and shape.) I encourage anyone to do this on a used, salvaged or new trailer bed, but it just did not suit me.
I will try to make the instructions apply to all types of foundation in this blog.
So, a Shepherd's Hut it is. See the picture(thanks Wikipedia) am I right...cartoon wheels, Right!
Thursday, July 17, 2014

Thursday, June 26, 2014
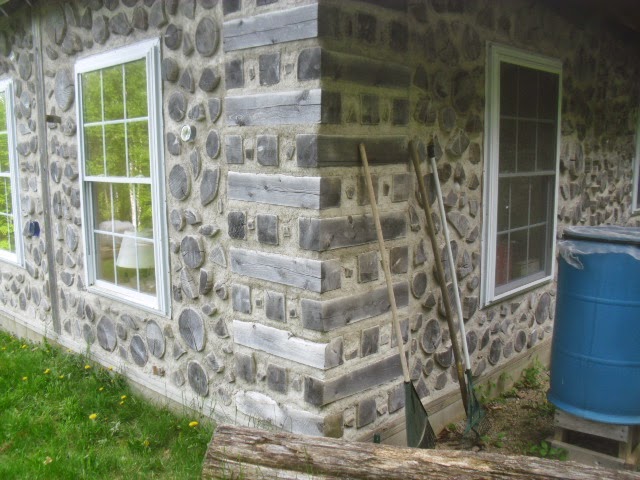
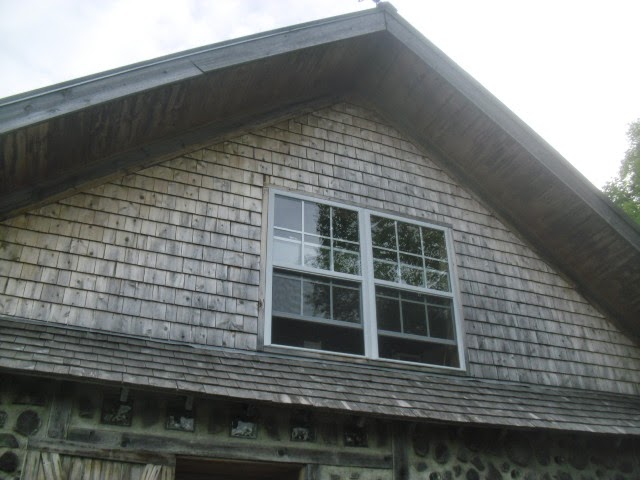
Details of Cordwood Constuction.

Remember that this house is built with a post and beam frame. A square cord wood house, may be subject to racking in high winds. The post and beam help with diagonal stability. Round and oval houses would be less likely to catch the wind that way.


My Sister's Bathroom
My brother-in-law and my niece built this in a few days to be the main bathroom of their cordwood house. The gas fired toilet was a disaster. The composting toilet did not work properly in the cold. So, this is just a very cute shed on the property. It would make a lovely retreat or spare bedroom. It is actually large enough to be a tiny house.


Notice the concrete pads as in the shed below.
No need to be too fussy with this tiny a structure.
Notice too, the brackets supporting the roof overhang on the front. These could just as well be extensions of the ridge pole and top plates, perhaps decoratively carved or chamfered.
There are no windows in the sides so that privacy could be maintained as a bath, but they could easily be framed for windows and/or a glass door for more light inside.


A Small Shed or Cottage in Maine


Take a look at a post on You Tube called Thoreauvian Simple Living.
Though this shed, near my sister's house in far northern Maine is even larger than the house in the video, it is not as high. Still, at about 12 by 16, or more, it has plenty of space for a small habitation, summer cottage or studio. Notice that it is on pads, just concrete disks actually. As long as there is sheet metal underneath to keep vermin out and insulation, this is perfectly acceptable. The only other caution is that it must be on virgin, well packed soil, or on ledge. Digging below the frost line is always a good idea, so that frost will not heave unevenly and twist your house out of shape, but for this tiny house, with no plaster or plaster board inside, the risk is minimal, and correctable. Fragile but ridgid materials will crack with any movement, but tongue and groove boards will move with the foundation slightly. Just re-level the foundation, and it will slide back in place with only minor complaints.
Wednesday, June 4, 2014
Don't Rush. Don't Be Excessively Cheap
Cutting corners may seem like a good way to save money at first glance. Certainly there are plenty of ways to cut corners effectively. Go to yard sales and thrift shops to buy linens and buy linen dish towels to make curtains etc.. Pre cut so no sewing, spring loaded rods...very easy and cheap.
Old linens that have no special appeal because of antique value can just be worn out cloth...this means you will buy over and over again.
Just an example that came to mind.
When you build, do not build with the first and cheapest materials that come to mind. If you find a lot of boards free on craigslist for instance, they may look like your wall sheathing...a real gift...but in time those boards will not give you the diagonal stability you need. You will never be able to use sheet rock if you do not have that stability. You can, of course, run sheet metal diagonals in your walls under the boards, but there is another expense and time. Just bite the bullet, and use plywood or some other sheet product and do the job right the first time.
Deke Diedrickson has a lot of great shelters built with salvaged materials and corrugated translucent panels, but you simply cannot have quite that mindset with a permanent building. Buy windows that are not all worn out, or be choosy when recycled materials are offered.....why be in the position of having to redo your work. If you come across a nice stained glass panel....that is a different story.
This sometimes means that construction will not be as fast as you would like. Saving up for materials takes some time. Finding just the right salvage will take more time.
You need to be patient and critical of bargains. Think long and hard about purchases and construction methods. It does not always help to be too quick and too cheap.
Thursday, May 22, 2014
Borderland State Park in Massachusetts
These are photos of the stone cottage located on the grounds of Borderland State Park in Easton Massachusetts. The stones are rather large for normal construction, but I would be willing to bet that the construction went fast. All of the stone is local granite.
The walls average at least 14 inches thick. The right hand chimney and the large fireplace on the left are a little too much. This would work well with a large central chimney and fireplace, but the two are very wasteful of materials given the efficiency of modern stoves. The main building is approximately 24 by 32 feet. The thickness of the walls and the size of the central chimney still make this a pretty small house. The square footage would be helped with a loft area.


Notice the pseudo arch above the door. The wedges of stone keep the weight of the roof and stone from pressing down on the door frame.


Saturday, March 15, 2014
A Move is Planned
I am soon to move from Massachusetts to far northern Maine. I have become used to a certain planting zone where I have been able to grow all of the things that were in my grandmother's garden in Medford, Massachusetts.
I actually plan to move to Italy for a part of the year and to Maine for the rest.
The trouble with both of these options is that Maine is very cold.. Zone 3-4 where I plan to move... and Italy...for the most part is in zone 8-9 with a wicked hot and dry spell in the summer. I will likely end up in the mountains, as the low lands are just too expensive for me. The mountains have the distinction of having nearly as hot a dry spell in the summer, but then they have cold and snow in the winter. I just can't seem to win.
Italy has a history of large plants in containers. It is not unusual to see olive trees, pomegranate, lemon, orange and other trees in large containers in the gardens and on terraces. They have the luxury of watering this micro ball of soil in the summer, and if the winter is cold, they can wheel the whole tree into an Orangerie. Orangeries were pretty common in France as well and are becoming more common in England.
I began a post about screen porches elsewhere in the blog, which I will complete when a blip in image uploads is solved. Now, I will have to post about glassed in or convertible porches to bring plants inside. I think that in these days of high fuel costs, and the sheer work of wood fired heating, that a greenhouse could be impractical in the far north. If you have unlimited funds or a real desire to cut wood from your land, dry it, split it and burn it, day and night through the winter...then please disregard that statement. Therefore, I propose a roofed and glassed in porch, either at ground level on a slab or gravel base, or on a raised floor porch with a full foundation like any other room in a house.
An orangerie, for the common man, is simply a room with lots of windows, with a place to stand the trees in their pots. A greenhouse would qualify, but they were often large rooms with a good sized entrance door and plenty of large windows, often high and arched.
Orangeries or conservatories were a common sight in the 18th and 19th centuries, in even fairly humble houses. Palaces and large country houses almost always had one. A family could have citrus fruit all year long in England and northern France if they had one of these...of course a staff of fifty gardeners helped as well.
There are a number of things what will help with the success of a room like this. Masonry floors or gravel floors, especially very dark colored ones, help to absorb heat from even weak sunshine.
Large containers like water barrels...painted black especially, absorb heat and radiate it out again.
Please stay tuned as I explore these options.
Thursday, February 27, 2014
Innovative Wall Coverings
Any fabric or paper can be used for wall covering. You should have a smooth surface to begin with. Start with partitions of plywood of any grade that does not have voids in it, or fill the voids with putty or plastic wood.
Simply glue paper from shopping bags with neat logos on it, old grain or flour bags, labels from cans or packaging with nostalgic graphics on them, dressmaker or upholstery fabric, ripped rags with frayed edges in layers etc.. Seal the entire surface with Linseed oil(It will alter the color and eventually yellow) or varnish or shellac(shellac alters with moisture).
Tear odd shapes of paper shopping bags,(about hand size) leaving all the edges very uneven and ragged. Layer the pieces over each other, gluing each piece generously and individually...layer, layer, layer, till a rich and textured surface is achieved. Antique with oil based or acrylic paints or stains(acrylic dries FAST!) till a nice texture appears...Paint on and wipe off...use earth tones. Varnish or oil in a low luster for a leather look.
Single widths or ripped and layered pieces of natural linen can be applied and sealed. Ragged edges will be beautiful and provide texture.
Layer torn pieces of colored tissue paper, gluing generously layer upon layer. Include pressed and dried leaves and twigs in between the layers of paper. Seal with oil or varnish...we used Mod Podge for this in the 70s, but who knows what is available now.
Cut the tops and bottoms off olive oil or graphic covered tomato cans. Open and flatten them and tack to the walls. Use the round tops of cans to make fish-scale shingles.
Soak off the labels of wine bottles or graphic shipping crates from wine companies. Glue them in overlapping or carefully laid out patterns.
Photocopy old prints and glue the photo copies on the walls.
Buy beautiful Japanese or other hand made paper and glue to the wall.
Cover plywood seams with varnished or painted half-round or Astagal molding. Or cover and glue on nice fabric or paper before attaching them.
Be creative.
Friday, February 7, 2014
A Screen house to Expand Liveable Space in the Warm Months.
My next door neighbors had a great screen house on the side of their house in Houlton Maine. I loved that house and the screen house allowed them to live outside from the beginning of May, right through September, with just light jackets at the beginning and the end.
Later on when I lived in the Bath-Brunswick area of Maine, my ex-wife and I became good friends of an older woman (probably about my age now) in a town near Popham beach. She used her screen house most of the year, as the screens were basically light weight storm windows with both glass and screens on two sides.
Strangely, she did the room on the north-west (inside) corner of the house, but she was still able to use it some days in the winter.
I will go over....in not too much detail, how both screened rooms were done.
The first hurdle to get over in a true screen house is that if you are bringing the walls of the screen house right down to the floor, be it concrete or wood, you are going to trap water along the inside perimeter of the screens. Rain will fall at an angle or be blown into the space through the screen and in trying to escape, or puddling up inside, moisture will collect against the joint between the walls and the floor, and cause rot. Unless you are doing something like aluminum frames for the screen and concrete or some other impervious material for the floor, there will be deterioration.
The one solution that I have seen in the past is to lift the screen off the floor somehow. Putting blocks under the frame for the screens will mean that only the blocks will need regular maintenance, instead of the entire screen frame. However, this also means that there will be a gap in your bug protection. You will need to cover that gap with screen. Perhaps only a narrow strip, stapled or glued to the bottom rail of the screen , and grazing the floor will do the trick.
Likewise, if a floor is made of dimensional lumber of some kind, there will be gaps between the boards, and screen will have to be used here, under the floor.
If you have framed your porch like a normal wall, and installed screened windows, there will inevitably wind blown water entering the room and puddling against the baseboards. Again. some provision needs to be made to keep water from settling there and rotting. Perhaps a panel or the baseboards can be removable inside and out, to be sealed up in the winter when the windows are closed. Presumably, this is not a heated space, so loss of R value will not be an issue from lack of insulation in that space. It would be a big chore to stuff insulation in a space like that in the fall and remove it in the spring.
I will do this over the next few days.
Wednesday, January 1, 2014
Benefits of a Low Knee Wall and/or a Saltbox/Shed Roof
Ok here is a simple profile of a house, gable end.
Here, just adding a couple of feet of knee wall on top of the top plate of the first floor, one not only adds headroom for a true living space, but by extending the roofline one can add floor space while still keeping the ceiling at the normal height on the first floor. Also, just by changing the angle of the roofline slightly, one can extend the first floor even farther. Of course, this extension of the roofline, means that the roof joists need to be supported by the back knee wall, and the angle of the roof should not be leveled off too much, or snow loads would be far more likely to accumulate. This is especially to be avoided in the north or in heavy snow areas of the country.
Subscribe to:
Posts (Atom)