Saturday, September 19, 2015

Tiny House and Shepherd's Hut.

What is the difference between the two?  Well, there really is no difference, except in their original intended use.  The shepherd's hut has been around in many European countries, and I suppose other places for centuries.  The idea was to have a place in the fields...in this case mobile to move from field to field or to storage..to care for lambs born and vulnerable to predators, cold etc., or the mothers before and after lambing.  One might need the shepherd's hut almost anytime that your presence was required in the fields.  Prior to these iron wheeled contraptions, tiny stone, log or timber huts were built in the fields, where the sun would warm the shepherd and give him a place to bed down close to the flock.  In France there are Bergeres.(Did I spell that right?)  Many years ago I stayed at Cité Saint-Pierre (Secours Catholique) in the mountains above Lourdes France. This was a pilgrim's shelter for all ages of Catholic pilgrims.  There, in a high part of the pasture around the site was a simple stone building which was meant to house a shepherd.  Perhaps it was just there to be a symbol of the Good Shepherd aspect of the place.  These tiny cottages are dotted all over sheep country.
 
Wouldn't this be a nice spot for a Shepherd's hut.  The post was looking a little dull, so I thought I should put something in!  This is my sister's land in Maine.

The shepherd's huts I am discussing were simply tiny cottages on cast iron wheels.  Of course now, even in England, they might put some on modern wheels or a trailer.
A "Tiny House" is simply a shepherd's hut that is meant for full time or long term living.  They can be the same shape and size,  though most "Tiny Houses" tend to be cut up into a warren of rooms for different uses, and a shepherd's hut tends to be mostly one big space.  The "Shepherd's Hut" tends not to have loft space, though there are no rules.


Ordering one of these from the builders in England or here in the states can be expensive, mostly over $25,000.00  judging by what I have seen, for a simple hut, where the more elaborate ones can be upwards of $60,000.00 and tiny houses can be more, as more materials and labor are involved for long term living.
 
My "Tiny House", I prefer to refer to as a "Shepherd's Hut", mainly because I plan to have it be quite open compared to "Tiny Houses" I have seen.
Of course, it is possible to reallocate space later on as I use the space.  In fact this might be a good idea so you get a feel for what you need, which is often much less than you think.


Except for the Box Bed area and loft, I plan to leave everything open, and all construction movable.  A Welsh cupboard is more practical than built in cabinets for instance.

Thanks Wikipedia for these three photos.

Wednesday, September 16, 2015

Prepping the Trailer

This is the time to discuss the trailer I suppose.  You have to have a serious trailer.  You cannot use one of these light landscape trailers for this.  the trailer must be very rigid.  Square tubine in extruded steel is a great choice.  Angle iron will do, "C" iron will work.  However, anything with nooks and crannies will collect water and rust will soon follow. 
If you can lift one corner of the trailer on a jack, and the frame flexes appreciably, then you need to think again.  You must reinforce, move on to a heavier trailer or try building something light like a TRUE SHEPHERD"S HUT(thin walls, light general construction) or a gypsy Vardo.  These will be much lighter and more forgiving of a little flex in the trailer.  A true Tiny House, or my heavy version of the Shepherd's Hut need a stable, rigid foundation. 
Consult people who know trailers about weight as well.  You are building the Titanic, on a bed of reeds here!  You need heavy duty axles and good weight handling tires and wheels.


The trailer is a standard car hauler.  This one was hand made by a guy in New Bedford, Ma.

 
There is 1/4 inch plate aluminum on the deck.  I have not decided if this was an advantage or not.  It certainly added to the weight.  I had him weld on more square tubing to expand the footprint of the building.  

 
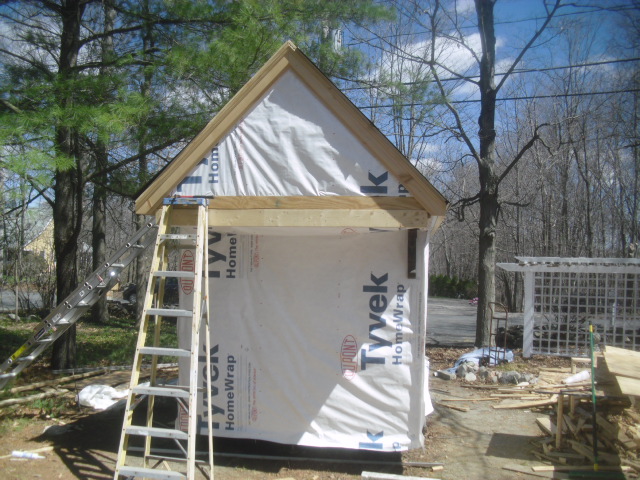
I had to add flashing to the gap in order to seal the building from the ground and road, and to fill in the gaps.

 
I most dread redoing the lights when I am done.


Everything had to be sanded and degreased to repaint it. 

 I used  Scrubbie pads and 0000 steel wool to do the work with alcohol and Goo-Gone degreaser.


I touched up the paint with a primer, then gave the entire trailer a coat of Rustoleum paint in gray. 

 Covering the welds seemed most important as those points rust first, at least superficially.

 With the added "wings" this ended up 87 inches wide and 18 feet long.  The back end overhang that you will see later, added an additional 2 feet to the length.    This was done so that I could put a full sized mattress up there, but still have shoulder room under the low eaves.  That meant going the length of the trailer instead of across.  The lower level went across, so the additional length needed for the length of a mattress became a bump out.


Unfortunately I lost all the pictures of the floor framing.  This was done just as any floor would be framed.  The drawback to the car hauler was that it had a slope at the back.  I had to frame the front with 2x4 and as I got to the back I had to cut 2x6 and larger at an angle to keep the floor level as the floor itself sloped away. 
 
 This was the first time I had ever tackled such a thing, and it was not entirely successful.  Oh, all will be well in the long run, but laying a flat floor will be difficult as the slope was not entirely erased.  The whole area under the bed for storage is at a slight slope.  Fortunately, very little will ever be visible.  This slope figures in every part of the hut, right up to the shingles on the roof.   How irritating!  But, I did the best I could with what I had to work with. Only one pair of hands...less than wonderful tools, etc., etc., all contribute to minor failures.  I learned SOOOO much.
 
However, despite the little quirks, I have proven that even this difficult issue with the frame and foundation was overcome for the most part.  You can indeed, work on one of these yourself; though patience is a virtue.
 
Next time...if there is one, I will use a hand made frame that is absolutely level.  This just requires a bit of time to have it made.  The alternative is paying double for the advertised pre-made trailers just for this purpose.  This is not a bad idea if there is a little extra money available for that.
 
   I drilled down through the framing into the square tubing and bolted the frame down to the tubing with threaded rod.  Then I filled the cavities with Roxul insulation, stapled down plastic film moisture barrier and screwed 3/4 inch chip board down for the deck. 

Framing

A normal house might be best with 2x6 framing, but with this tiny space, I thought I would do well with 2x4.  The normal construction might be 2x3 or even less in the case of a real Shepherd's hut.
I noticed, even with the spaces unfinished and with gaps, that it stayed fairly cool inside once it was insulated, so I think that the thinner walls will do nicely in this small space.


This was all just standard framing with the exception of the wheel wells which actually floats above the well, supported on doubled framing at either end of the wells.


 You can see the plastic membrane that covers the insulation in the floor, and I did the same thing in the walls and ceilings once they were insulated.


 I just tried out the stained glass windows in the open spaces, but I scrapped some of them in favor of windows I liked better, so the framing was scabbed on to to make the space smaller.


Sheathing On

 
The roof had a ridge pole to make it more rigid and to help with snow load.  The rafters were all 2x8. 
a ridge pole  is supported at either end of the building, so that if snow gets really heavy, the outward thrust of the roof onto the side walls will be lessened by its end support.  This makes it less important to have cross beams, so the space can be opened up.  I will see if the roof sheds snow easily, which it should do because of the rather steep angle, but if it does not, I will put in a couple of wrought iron cross bars to mitigate the thrust.  I think that the wrought iron will be fairly unobtrusive and will be in keeping with the more or less Victorian look of the interior.   I have a wrought iron and Oak chandelier that I can hang up in the roof vault, so I think it will all blend well.
My stepfather, Paul McLaughlin and I turned the central shaft of the chandelier from a hunk of Oak that came from the tree that I used to swing on as a child.


I screwed plywood on with bronze deck screws


The bump out allowed for more length for a bed oriented the length of the trailer, while the bed below was across the space.  This gave more floor space while giving me a place to sleep four.  The "sills" of the bump out were screwed to the top plates of the main house to cantilever out into space.  The cantilevered floor had to be insulated carefully to avoid drafts.


I also regret not having my pictures of the roofing.  The roof was covered with a thick, sticky asphalt membrane, then shingled over with asphalt shingles.  The membrane literally melts on to the decking and itself.  The ridge was left open a couple of inches and a ridge vent system was put in to ventilate under the roof.  Foam channels under the insulation against the under side of the plywood, channel air from the eave vents to the ridge vent.


House Wrap On


Nearly Finished Walls, Window Trim Inside and Out.

 
The stained glass windows are all English antiques with the exception of the lower level in the next two pictures.  It came from southeastern Massachusetts.


 This is just a Home Depot single hung double glazed window.  I just had to be practical with at least one window.  I can always replace it later.  I have tons of scraps of stained glass from the 18th and 19th centuries.  I can have them placed into a simple rectangular or diamond grid glass window later.
The interior wall sheathing was 1/4 inch hardwood veneered plywood.  Ply increases stability and racking.  This is also a great paintable surface.  I like wood...good wood, but the amber tones of wood make the space shrink.  You may be able to see the rows of screws that run along the wall studs.  These will be covered by moldings and the entire interior painted white or a pale pastel to give the space a boost.  Warm colors advance...amber, red, browns etc all advance to your eye.  Cool colors recede, blue being the best...just not too dark.  Just go somewhere that you have a long view some nice or bad day.  You will notice that trees and hills in the distance have a distinctly bluer cast than those that are closer.  Also those distant colors are whiter than the closer colors. The blues and whites trick your eye into seeing SPACE.


Shiplap for the Ceiling.


I like wood...good wood...but very little wood is good...Does this seem a little like a rhyme?
Also, the amber tones and the browns and beiges of wood, make the space appear smaller than it is.  So everything will be white, with a light stone blue or pebble grey trim.  The ceiling will outrage people if I paint it, so the plan is to paint it with thinned white paint, then wipe it off, so the grain will be there, and the whiteness will continue onto the ceiling....the best of both worlds.
You cannot see them in this picture, but I am using huge cut nails with a thick head.  They will be exposed, I think this will add some interest and nostalgia to a large expanse of nothing much.
I may also use rose headed nails to attach moldings as well, for additional interest...I will try a couple and see how I like it.

 
The windows, except for the main one in the living space are all English from houses built in the North of England from the 1880s to the 1920s...I like the colors in most, but it came down to style, and the more Art Deco styles were just not for me.  I am replacing some frames with Oak, cut by me to hold double panes, and those that are in good condition will get a restoration, and a panel of Plexiglas screwed over them to protect and for added insulation value.


 This was too DECO for me.


This will be in the bed area on the bottom.


  This too was too DECO for me...like the front of a Caddie or Chevy.


This one will go in the front door, just a bit more Art Nouveau.


This will be over the kitchen sink, again more Art Nouveau


This will be in the loft bedroom.... curvy.  It reminds me of a Lady's Slipper or a Japanese Iris or  even an Orchid.  Some people look at this and immediately see a bird with a big blue moustache...I suppose that since it is in an area that might appeal to children, seeing funny things in it will be good.
 
 
This one does not belong to me.  I thought long and hard about it, and I really loved it.  Now I kick myself every time I look at the picture, realizing that it was not really all that much money in the grand scheme of things.  Damn!!!
At least it is not a copyrighted pattern, so with this picture I can make one for my studio when I build it.
 
Windows like this are readily available on line at specialty sites, on EBay and similar sites, or in salvage yards across the country.
 
Stained glass is inherently drafty.  Whiting is rubbed into the joints between the glass and lead to help to fill the gaps, but invariably, this works its way out.  A good solution is to put a layer of glass or Plexiglas outside to cut drafts and other weather issues.  Make sure that these can be removed easily to be able to sop up condensation or to do other repairs.