
I just finished building this door from scratch in an English style at about 5:30 in the pitch dark. I was so exited to get it done that I had to dry fit it and take a photo. I am afraid that it is kind of a mass of beige wood in this photo, and the horizontal bar is just to hold it in place for the night. But it has the antique English stained glass in it, and that is now out of my hair(or my dining room floor) , and perhaps I can quit worrying about breaking it.
Inside, the boards from my neighbor Mike were cut into ship lap, and used horizontally in the 18th century manner. The entire door will be studded inside and out with antique reproduction three faceted nails like the cabinets inside.
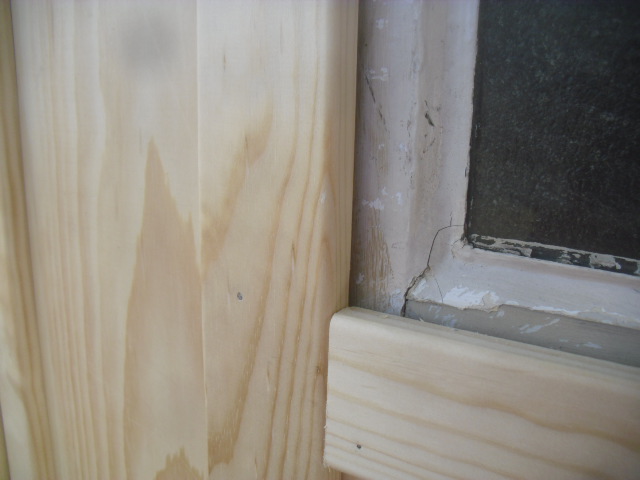
The flat boards on the top and bottom will be where the antique, wrought iron strap hinges will attach. Presently the stops on the door frame are set up for a two layer door of 1 1/2 inches thick, but I will move them in so the three layer 2 1/4 inch door will fit flush with the woodwork around the opening.
I am thinking bittersweet orange, antique red, black, soldier blue, or forest green for the door color. I could also go a little more English cottage and do a pebble blue gray.

So here is the door in daylight, a little easier to figure out what you are looking at.

Here is the inside. Notice the horizontal lines. These are the ship lap boards I manufactured out of boards I got from my neighbor Mike, who went to great trouble planing them down for me.

Here the door is mounted. I drilled and screwed in the pintles, which went quite smoothly, but then you have to put the door in place, shimmed as you want it when finished, and bolt or lag screw them into the door. This is not very secure. In my case, I almost do not want to be too secure. I would rather people walk right in than tear it apart to get in. A more secure way to mount these is to use carriage bolts,and bolt them inside. The only issue in this case is finding bolts that do not have the angular shoulder under the head of the bolt. This will not go through the holes in the hinge. I will find some and bolt them then. Nails, clinched over inside or bolts are not nontraditional.

I am afraid that my camera was rebelling against me, and refused to get a good flash so the door could stand out in this back lighted photo.

One caution with these. The fit of the hinge on the pintle is never very tight, so you have to use precautions when you mount them on the door. The door on the knob side will want to droop. The top hinge must be pulled as tight as possible toward the hinge side when you bolt it in place. The bottom of the door will want to push away from the knob side and become tight against the jamb...too tight. So, to cure this, you must push the hinge as far as possible to the jamb side of the door before bolting it. This keeps the door pushed away from the jamb. You have to think carefully and outwit gravity. Also, these are screw threaded pintles. They are easy to install, but they have the habit of moving slightly with use. You have to be keeping an eye on them constantly to
re-adjust. A drive pintle, which has a barbed spike instead of a screw, will move only with the greatest effort, and remains quite stable.


The window is not really attached to the door. It has an overlapping frame on the outside and an overlapping frame on the inside. I will have to fit in foam or felt strips to seal the window as I go along. Also, I can remove this and put in a screen in the summer. This will be a bit tighter when I put in a layer of Plexiglas on the outside of the window frame. Boy is that frame crooked...I see I will have to re cut those...you can tell I did this in the dark, or maybe my work always looks that way!

This is a laminated door. There are vertical boards on the outside, covered with a layer of moldings and a plank on the top and bottom for a stable hinge mounting area. Then there is an inner horizontal layer of ship lap. Both inside and out will have decorative and functional nails throughout. All the layers are caulked at seams and glued. I screwed it all together and used finish nails to hold the moldings till the nails are added today.


No comments:
Post a Comment