Tuesday, September 15, 2015

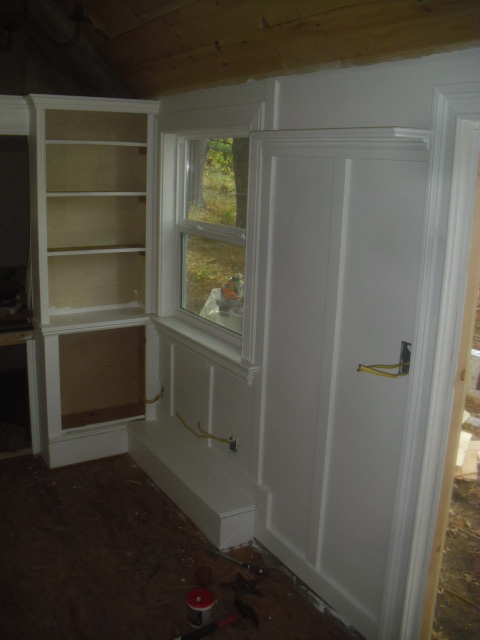
The Bed Alcove Almost Ready to Paint

The entire interior of the hut is lined, with the exception of the ceiling of the loft, with 1/4 inch hardwood plywood.  This is a very smooth surface and will take paint beautifully.  It is unfortunate that despite the fact that I like wood, it is too beige/gold/brown to make the space feel large.  Those earth tones will feel oppressive in the small space.  Remember that the entire hut is only 87 inches wide, and 18 feet long on the first level and a 2 foot extension in the loft.  This will feel very claustrophobic over time unless something is done to lighten up the space.  All of the seams between the panels need to be covered, and all the lines of the screws attaching the panels to the studs need to be covered as well.  I found a casing in the molding area of my local Home Depot that is simply a flat piece of wood with slightly rounded edges.  This I nailed and glued over all the seams and stud lines, then tacked them up with finish nails.  These will also have another molding over them, just running down the center of each one.  This will be astragal molding, which is a symmetrical profile.  Then all the walls and moldings will be painted a white, and the alcove and accent fabrics, etc., will be a light blue to help in expanding the space, as blues tend to recede to the eye.
 
 
Though too damaged to be reused as is, I cut down an old mahogany mantle I had stored in the barn to use as a headboard.

 
I added astragal molding to the seams and rows of screws, butted into the cornice molding that is just a plain molding that is proportionate to the size of the bed alcove.

 
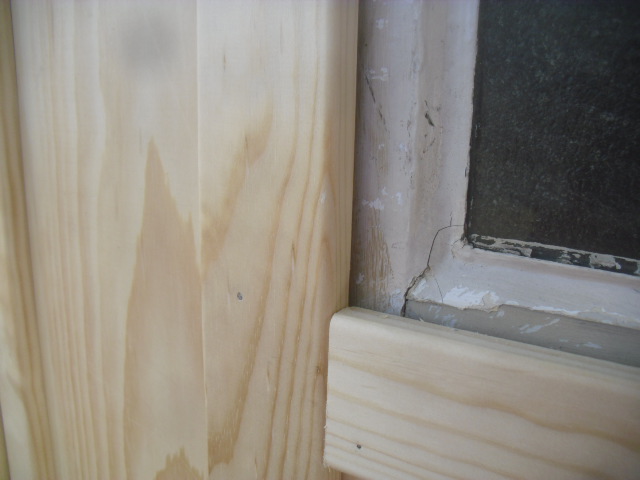
More of the moldings covering the screws in the bed alcove.
One of the things I learned from this process was that I needed to do a chalk line or a pencil line to position the screws into the studs.  Just the 1/8 inch wandering from the straight line makes it very difficult to apply the molding straight when the moldings are so narrow as these.  I know that someone will lie in this bed someday and say: " Who the hell put these moldings up, they are crookeder(is that a word) than hell!"

Monday, September 14, 2015

The French Lieutenant's Woman

Here is the address for a clip from "The French Lieutenant's Woman".  There are several related clips that will show this room as well. This room was the inspiration for the interior of the Shepherd's Hut.  As I got deeper into it, I realized that there was going to be less and less wall space than I wanted, but it still inspires the paneling with moulding battens and the white, though there will be blue and even a couple of spots of yellow or apricot to warm it up.  The loft will also be white, but I have a blue and white floral coverlet for the bed. 
When I looked at this film, I rhapsodized over the space with its simple white walls and woodwork.  Then I realaized that it was done in 19th century northern England, and I could not even imagine all that white in cold, damp England.  When I applied the white in the tiny house, I purchased a white that had a bit of orange in it.  The color will be barely perceptable if at all, but the bit of warm color will help a lot.
Whites with yellow, pink, orange and violet will help to warm a space a bit.  Greens, blues and lavenders will cool a space a bit.  Beige is almost always slanted toward these colors as well, and can affect the feeling of warmth or coolness in a space.
Much as I love wood, be very careful about having a space in all wood tones, because they can seem very claustrophobic. 

https://www.youtube.com/watch?v=yx2giHzJ4-I

I Painted the Main Room Lower Level Today

 
As usual, it says one coat, you pay extra for it, and it does not cover in one coat. 
This looks white, but it is a very----very pale orange. 
Much of the decoration in the space will have blue in it, and the alcove will be blue, so the complementary color in the white just seemed to make sense to warm up the white a little.
This corner will have a screen and behind it the composting toilet. 
 
 
The ceiling will be wood patterned when I am done, but it will be washed with a thin white and wiped off so the color will not be too oppressive. (Pickled)
 
 
This corner will have a simulated Welsh cupboard to hold all the kitchen equipment, and the gas stove will be at the far right.


The inside of the cabinets will be either a sunny pale yellow, or a strong apricot, again a complimentary color to go with so many blues.  Yellow is not a compliment, but with a red carpet added(the only carpet I have that will fit) it will make another color system of three primaries if I decide to use it.  The red carpet will not go quite as well with the apricot, but I may have to suffer. 

In this photo the stove will be at the extreme left.  The dining table will pull out of a slot at the right, between the cabinets.  "At present, I have very few pieces of quality tools, so the table top will be five boards of Bird's Eye Maple, with a little spline between them.  Later, if I have access to a jointer, I can glue them up into a single unbroken piece.


I think I have decided to leave the baseboards low like this.  That will reflect the narrow boards in all the other woodwork, and will not take up any visual space.  The cabinet doors have been removed while I paint.  All the lower spaces will be covered.  No wood will show. 


Basic Color Theory-Systems of Color


There are several systems of color that can be used for interior design, colors for the outside of your house, garden plant color or just general design application.  Many of the choices you make using the color wheel may already be a part of your thought processes without really knowing why.  You may instinctively know what colors look good together...many think they do...but do not.  So here are a few of the systems you can use successfully.  Remember that it is not always wise to just use the colors just as you see them on the wheel, and there are thousands of colors in between the ones pictured.  You may use tints and shades of the color, or colors that are just close to what you see.
I thought I might as well include this little tutorial as I have been discussing it informally throughout the blog.  For instance I recently wrote that I had a basic blue and white color scheme in the Shepherd's Hut.  I said that my white was not really white, but a very pale tint of orange.  Blue and orange are natural compliments to each other.  I would certainly not paint the house blue, right off the color chart, then put orange trim everywhere, also right off the chart....Way too strong!  But I am using a sky blue with white that had a minute tint of orange in it.   I might use apricot or melon in the book cases, or perhaps a sunny yellow...see if you can understand why I make these choices from the information below.
 
The color wheel below is not terribly clear, but you can search one on line or buy very sophisticated ones in an art or home decor store.
 
 
1. Tints of a color are colors that are simply softened slightly with the addition of white.  Adding more and more white(or just less pigment) can produce a large range of tints from one color.


2. Shades of a color are just pure colors that have black added to them(or just more pigment) to produce a darker shade.  Adding more and more black can produce a large range of shades from one color.


3. Grayed colors or pastels, are colors that have had their COMPLIMENTARY (a color opposite on the wheel) color and usually white added to produce a grayer or browner variation of the color.


4. Complimentary colors are colors that are located directly across from each other on the wheel.  We all know that Red and Green look good together at Christmas, but doing a room in those colors, right off the wheel may be uncomfortable or even jarring...try tints and shades of the colors.  Yellow and purple work well together, but are hard to use in a room without wearing sunglasses.

5. Primary colors are Red, Yellow and Blue.  This is a TRIAD...three colors equally spaced around the wheel.  They work well together, again, perhaps not the color exactly as seen in the wheel, but generally good.  Try moving to one side of a color slightly to interrupt the jarring brightness, or using tints or shades.  Primary colors are called primary because they cannot be made using other colors.  You cannot mix two colors to make BLUE.
 
6. Secondary colors are between the three primaries.  They would be Orange, Purple and Green, and each is a mix of the two primaries on either side.  Many successful color schemes typically include a primary and a secondary color together.
 
 
7. Analogous schemes.  These are colors which appear all together(side by side) on the wheel..Start with green and take the two on either side of it, for instance.  Any two or three in a row usually work, or skip one space, using the colors two away on either side of the original.
 
8.   You can take any of the triad schemes equally spaced around the wheel, and move all of them together, one space at a time to the left or right.
 
9. Do not be too strict with these systems.  They are beginning points only, and trial and error, keeping them in mind as you go can produce wonderful results.  There are so many color choices out there today, that you may never see colors that you can specifically identify.
 
 
10. Beiges and grays.  Beige and gray are not colors on their own.  They are usually blends of compliments and black and white.  If you squint your eyes slightly and compare to other colors, you will often see green or pink or some other color in all beiges and grays.  Keep that in mind when you mix them and use the systems of color to make them work together.  This propensity to have other colors dominant in these neutral colors, makes it difficult to mix them together from different places.  You may say you are using beige in a room, and buy beiges at a random store, only to find that they do not blend at all. 
 
11.  Most colors in the paint stores have other colors showing up in them.  For instance, today I went to the paint store and looked at yellows.  It seemed that almost all of them were very green, and this was not suitable for my blue and white project.
 
 
12. As you can see, Blue and Yellow go well together..the yellow is a NEAR compliment, it is just to one side or the other of the perfect compliment which is orange. 
 
13. Some colors act as a neutral, and can be used with any other color.  I find that green works with everything, sometimes with slight adjustments...after all, who ever worried about the wrong color flower on a green plant.  I think that Eggplant is another good neutral.   Try it and see if you agree.
 
 
14. In general, neutrals have some element of mixture of any triad or pair of compliments...they come out grayish or beige. 
 
15. Actually any two colors go well together, if tinted, shaded, or used judiciously.  Having a system of color makes you restrict yourself from too many colors, and can make adjoining rooms blend easily etc..   One thing I would advise is that you do not try to mix reds together without extreme care, blues, greens etc..  Trying to make colors match, and only coming close can really raise eyebrows.  Better to mix different colors instead of trying to match colors and only coming close.


Thank you Wikipedia for the color wheel.  As usual, it is a wonderful resource, and those who can afford to support it can do so knowing that it is a worthy resource.  Those who can, can also join the editorial branch of Wikipedia to edit, or create new subject matter on line.

Kitchen Cabinets

I like old Welsh cupboards and jelly cabinets or cupboards.  When I was growing up, we always stored home made preserves etc. on shelves in the staircase that went down to the cellar.  But most households in the 18th through the mid to late 20th century had an unused room, a summer kitchen, basement room or root cellar where it stayed cool, but did not freeze.  This is where the jelly cupboard would be kept.

  They were shallow, deep enough for two or three jars, depending upon how wide the boards were that were available.  Some boards in my old house in Wiscasset, Maine had boards in places that were 28 inches wide, and floor boards that were 22 inches.  But those boards would accommodate just too many jars of heavy preserves and would likely sag in the middle.  I have rarely seen these more than a foot deep.

 
Here is a jelly cupboard or pie safe photo from Wikipedia.

  Making preserves and pickles is not a dead art, but as a kid, most people made at least some of grandmother's old recipes and it is a rare phenomenon today.

   I wish there was more scope for experimentation in the little house as there are so many old designs and colors.  Now I have to decide how to paint them.  I have some wonderful quilted pine board.  I may use pieces of those for the panels in the middle of the doors with a clear finish and paint the rest of the pieces some startling color.

Today, at antiques fairs all over, there is a rush from the gate to find startling blue painted furniture, aged, chipping and worn at the edges and where generations of hands have touched the doors and frames.  Perhaps I can find some milk paint in that color.  That would open some eyes as they stepped into the room.  Browns, old reds, soft yellows and greens were also common, but less sought after today.

 
I went so far as to buy an antique beading plane, but I cannot get it sharp enough without practice to get a nice edge.  I will perhaps ADD a bead of some kind instead. 
It is a joy to use and own these antique tools and eventually I will master this one, though I think I will avoid my Birdseye Maple as the grain is far too contorted.
 
 
The toe space below will also hold shallow trays for storage, covered with a piece of cloth to keep dust out.  I have to have some place to keep my pizza stone and peel after all.

 
This is an eighteenth century design for a hanging set of shelves.  All the shelves are supported from underneath as well as the top, being attached to the underside of the loft floor above.  The cavities between studs will become storage all the way across the underside of the floor, possibly for pan covers, spices and seldom used utensils.  All the unsightly things and things usually found in more ambitious cabinets can go there and not take up the extremely valuable counter and cabinet space.

 
These have not been shimmed for level, as the floorboards have not been laid yet.  This will add 3/4 inch to the height, plus the thickness of the counter top.
 
The void in the corner will have counter on top, but it will be storage for batteries when I go solar.
 
These cabinets are pretty easy.  I used bead board cut to the final height of the cabinets minus the counter top.  They were thirty-six inches in my case as my family is not short. I assembled and trimmed to width the four or five boards and nailed on a 2x4 top and bottom across the boards to hold them together.  (You might wish to make the 2/x4s a quarter of an inch short and add a piece of 1/4 in ply to the back, but I did not, so I would have access to the wall inside. (before I assembled the panels, I trimmed the tongue off the leading edge, but left the bead detail next to the tongue, and grooves at the back against the wall.  (The groove side will be easy to plane to fit against the wall if you want to be that precise.) 
 
I nailed the ends of the tongue and groove boards with tiny finish nails to the 2x4s  just to hold them together while I continued.  I placed the panels on the floor and drilled a hole in the center of each of the tongue and groove boards and nailed the rose head nails into them. 
 
The two side panels were ready and I stood them up with the 2x4 sides toward the center.  I cut, nailed and screwed the floor of the cabinet, cut from heavy plywood, to the bottom 2x4s.  You could use wide boards or ship-lap for this. 
 
Then I made the face frame from 1x4 lumber, with half lap joints just cut on the table saw. 
The half lap boards are as follows:  The top rail has the half lap cut on each end of the front of the board.  Each leg has the top back removed, and a foot cut into the bottom.  There is no bottom rail.
 
I glued the ends of the top face board to the cabinet,(to the 2x4s) then screwed the board to the frame (inside the joint where the next piece of the face frame would cover the screws).   The top board has the two ends with the cut half lap facing forward.
 
  The two "legs" (stiles) of the face frame have the half lap cut side facing into the cabinet.  They overlap the top rail of the frame. 
 
Then I applied glue to the open face of the joint and placed the vertical parts or legs of the frame on the left and right sides.  I clamped the halves of the joints together while I drilled and nailed the edges into the cabinet with the rose head nails and finish nails. 
 
In all cases the finish nails were just supporting roles.  The rose headed nails were the workhorses.  See the clamps below on the face frame.  These cabinets will not be attached permanently to the walls or the floor as they may need to be moved for access to the batteries stored in the corner.
 
The tops or counter tops will be manufactured separately and attached to the top 2x4s on each side of the cabinet.   
 
I will probably put a corner brace in the top of the cabinets from the 2x4s to the walls to prevent racking but will allow quick access to the wall and for removal.  If I decide to move these elsewhere, I can always add a back board to prevent racking.
 
The feet were cut out to lighten the look from the front, with a jigsaw, but continue to hide the 2x4s behind them.
 
A close look with give you all the information  you need to build these yourself.  I did both cabinets in a few hours with minimal tools.  The cabinets and the wall shelves took perhaps 6 hours total.  They will take less time if you use normal finish nails and avoid the drilling.  You can also use new or antique cut nails to do the same job, and if the wide part of the nail is aligned with the grain of the wood you should not split too much wood.  Try a few samples first, or drill anyway.
 
Always remember that with ANY square nail, to avoid putting them too close to the end of any board even if you have pre-drilled.

 
These look a bit awkward and squat because the base cabinets are deeper than normal for storage.  Also, fitting a sink into the top of one required a minimum depth.
 
I tried to align everything so that it had some of the effect of a Welsh cupboard.
The shelves are pretty close to correct, but most antique cabinets tend to be pretty shallow.  These are deep enough for a little storage, as well as the refrigerator.

 
Fortunately there is a factory that makes cut nails and reproduction rose head nails right here in my town.  I used them for all the joints, in addition to a little glue, screws (where invisible) and finish nails.  I will also use these nails in a larger size, in the front door.  
 
In a project where it is almost routine to run to the building center twice a day, I had exactly the right number of nails for this entire project.  Good thing too, as they are quite expensive.  It is hard to get things level in this project as the trailer moves a bit and sinks in the sand a bit as well.
 
 
To make this pattern, you just draw a center line that will become the little vertical barb in the curves.
 
  Then you divide the space you are going to use into the number of shelves plus the cornice(this measurement will be determined by the moldings you have chosen.) and the return to the wall.
 
Then I just used a salad bowl after trying five or six different pieces of crockery, and drew the semicircle on each side of the central line, one protruding out from the wall and one cutting in toward the wall.  I left a 3/4 inch space between the curves to form the little barb that you see in the picture. 
 
 Then I measured in from the extreme outside curve to the width of my boards, and drew a line there parallel to the original central line.
 
  The top is added to hold the moldings for the cornice and a return to the wall added below with the same soup bowl radius.  If I had more height to waste, I would have added some flat space to the lower edge of the cornice.
 
  I cut the pattern from newsprint(an artists paper, not the local newspaper.  The ink will rub off the newspaper.) and transferred it to the wood.
 
  I cut it out with a jigsaw and sanded the hell out of it.  Jigsaws leave a horrible rough edge.  A band saw and a good drum sander would be a great help here.
 
I assembled the entire thing with small finish nails to hold it together while I went on to the next step.  Glue would help too. 
 
 The square-shanked rose head nails can be very rough on a piece of wood, so to prevent splitting,  (The square nails increase in width as they are driven in, and the rose headed start small and sharp, then grow to a large square and then taper a bit.)  I drilled holes into the finished piece and hammered the rose head nails home.
 
I screwed the top board to the top of the shelves and screwed the entire piece to the ceiling.
 
  Then I placed a small strip of wood up against the wall under the full length of each shelf and nailed them up with the rose headed nails into the wall studs.  This will give the shelves support for the entire piece, but will also minimize sag on the individual shelf. 
 
You often see decorative front boards, cut into lacy patterns, nailed on the shelves in many Victorian pieces,(at least the more ambitious or skilled pieces) with the width of the board going at right angles to the shelf.  This would stiffen the front of the shelf as well.  However, I have no tools to do this, and it lessens the space for tall things to slide in easily.  Very early shelves might be very thin indeed.
 
Then I came back and nailed the back edge of the shelves into the little shelf supports with small finish nails to prevent them from coming away from the wall and losing support.
 
A narrow shelf can be added to the very bottom return to the wall for spices etc..
 
A dado can be cut for each shelf to fit into the vertical members, but I just did not have the tools or patience for this. Old pieces can be found made both ways, often with a tiny shelf support like a half round to add support to the ends.  I may still do this, but what I have done should be enough.  It should be OK as the shelves are too narrow for big stacks of plates etc.. 
 
I remember marveling at 18th century houses with thin, delicate but wide shelves cut with tiny rabbets for supporting intersecting shelves like tiny half lap joints.  They could not have been 1/2 inch thick, yet these thin boards had tiny rose and square shanked nails driven into them at the joints. and were still solid after 200 plus years.  It is amazing what impresses you about old houses sometimes.
 
Shelves like these could easily go from floor to ceiling, as long as they will not hold very heavy loads.  Great for a porcelain collection or something of that ilk.  Books might be too much.
 
You also have the option of cutting a thin groove a couple of inches from the back edge of each shelf.  These will allow you to stand a plate on edge for display.  Sometimes the same thing is done with a little piece of quarter round molding tacked on the shelf.

The New Door is Dry Fit and Hung.

 
I just finished building this door from scratch in an English style at about 5:30 in the pitch dark.  I was so exited to get it done that I had to dry fit it and take a photo.  I am afraid that it is kind of a mass of beige wood  in this photo, and the horizontal bar is just to hold it in place for the night.  But it has the antique English stained glass in it, and that is now out of my hair(or my dining room floor) , and perhaps I can quit worrying about breaking it.
 
Inside, the boards from my neighbor Mike were cut into ship lap, and used horizontally in the 18th century manner.  The entire door will be studded inside and out with antique reproduction three faceted nails like the cabinets inside.
 
The flat boards on the top and bottom will be where the antique, wrought iron strap hinges will attach.  Presently the stops on the door frame are set up for a two layer door of 1 1/2 inches thick, but I will move them in so the three layer 2 1/4 inch door will fit flush with the woodwork around the opening.
I am thinking bittersweet orange, antique red, black, soldier blue, or forest green for the door color.  I could also go a little more English cottage and do a pebble blue gray.


So here is the door in daylight, a little easier to figure out what you are looking at.


Here is the inside.  Notice the horizontal lines.  These are the ship lap boards I manufactured out of boards I got from my neighbor Mike, who went to great trouble planing them down for me. 


Here the door is mounted.  I drilled and screwed in the pintles, which went quite smoothly, but then you have to put the door in place, shimmed as you want it when finished, and bolt or lag screw them into the door. This is not very secure.  In my case, I almost do not want to be too secure.  I would rather people walk right in than tear it apart to get in.  A more secure way to mount these is to use carriage bolts,and bolt them inside.  The only issue in this case is finding bolts that do not have the angular shoulder under the head of the bolt.  This will not go through the holes in the hinge.  I will find some and bolt them then.  Nails, clinched over inside or bolts are not nontraditional. 


I am afraid that my camera was rebelling against me, and refused to get a good flash so the door could stand out in this back lighted photo.
 
 
 One caution with these.  The fit of the hinge on the pintle is never very tight, so you have to use precautions when you mount them on the door.  The door on the knob side will want to droop.  The top hinge must be pulled as tight as possible toward the hinge side when you bolt it in place.  The bottom of the door will want to push away from the knob side and become tight against the jamb...too tight.  So, to cure this, you must push the hinge as far as possible to the jamb side of the door before bolting it.  This keeps the door pushed away from the jamb.  You have to think carefully and outwit gravity.  Also, these are screw threaded pintles.  They are easy to install, but they have the habit of moving slightly with use.  You have to be keeping an eye on them constantly to
re-adjust.  A drive pintle, which has a barbed spike instead of a screw, will move only with the greatest effort, and remains quite stable.


 The window is not really attached to the door.  It has an overlapping frame on the outside and an overlapping frame on the inside.  I will have to fit in foam or felt strips to seal the window as I go along.  Also, I can remove this and put in a screen in the summer. This will be a bit tighter when I put in a layer of Plexiglas on the outside of the window frame. Boy is that frame crooked...I see I will have to re cut those...you can tell I did this in the dark, or maybe my work always looks that way!

 
This is a laminated door.  There are vertical boards on the outside, covered with a layer of moldings and a plank on the top and bottom for a stable hinge mounting area.  Then there is an inner horizontal layer of ship lap.  Both inside and out will have decorative and functional nails throughout.  All the layers are caulked at seams and glued.  I screwed it all together and used finish nails to hold the moldings till the nails are added today.


Dead as a Doornail

In early times the type of door I have done here was fairly common.  As discussed in the last post, this is a laminated door.  Several layers of wood make it up.  


It required nails to hold the layers together in an age where glue was less...Super.


Nails in early times were fairly brittle.  While you could get fairly maleable iron, most nails were not. and you could not afford to buy special nails just for the door.  When you bend over or clinch a nail, a maleable iron nail could be straightened and reused.  Very frugal you know.  Usually a nail was driven through all layers and clinched over inside to make a very durable slab of wood that would not separate.


It was not uncommon to burn a house to the ground when leaving an area, just to recover the nails from the ashes.  If your nails were not maleable iron, they could not be straightened out again, so they were said to be dead nails. 


So, here is the expression.... dead as a door nail.  Many nailing patterns were very complicated.  In this case, I kept it very simple.

 
Who knows, in a couple of days I may look at this and decide to add a hundred more nails to the pattern.
 
 
And I re- cut the frame around the window to straighten it.